How to Set Up Google Search Console, And Why It’s Basically Free SEO Gold

Imagine launching a business but never checking to see if customers are actually walking through the door.
That’s what running a website without Google Search Console (GSC) is like. You’re flying blind when it comes to how people are finding (or not finding) you on Google.
And out of all of my new client consultation calls, I’d say 90% of them either don’t have it set up, or set it up and never look at it. Which, in the eyes of an SEO, is blasphemy!
GSC is your website’s control center, giving you insights into how your site appears in search results, what’s working, and what needs fixing. For small business owners, it’s an essential tool for improving SEO and staying ahead of potential issues.
Your eyes don’t need to gloss over at the sound of data. Trust me. This data is super valuable and easy to access once it’s set up.
In this guide, I’ll walk you through how to set up Google Search Console, and I’ll show you the key features you should be using to optimize your website’s performance. It’s one of the first things I recommend to anyone I work with before completing your SEO audit.
-
Choose Domain (DNS) or URL Prefix (easier) property
Verify your site (HTML tag, file upload, DNS, etc.)
Submit your sitemap (example.com/sitemap.xml)
Check coverage and performance reports after a few days
Want the walk-through with tips, examples, and screenshots? Keep scrolling.
What is Google Search Console and Why Do You Need It?
Google Search Console is a free tool from Google that helps you track how your website shows up in search results. It tells you which search terms bring people to your site, how Google views your pages, and whether there are any issues hurting your visibility.
But here’s the catch:
GSC only starts collecting data from the day you set it up, so the sooner you do it, the better.
If you’re a small business owner, this data is essential for improving your SEO and making sure customers can actually find you online.
Key Benefits of Google Search Console:
Performance Monitoring: Track how your website is performing in Google search results.
Keyword Insights: See which keywords you are already showing up for in search results.
Index Coverage: See which pages on your site are indexed by Google and identify any issues.
Mobile Usability: Ensure your website is mobile-friendly, which is essential for SEO.
Security Issues: Get alerts about potential security issues.
Creating Your Google Search Console Account
To get started with Google Search Console, you'll need to create an account and add your website. Here's how to do it:
Visit Google Search Console: Go to Google Search Console and sign in with your Google account. If you already have Google Analytics set up, make sure to use the same account. In fact, I always recommend starting with setting up your Google Analytics first, so if you haven’t done that yet, go set that up with this tutorial, and then come back to setting up GSC.
Choose a Property Type: You can either add a domain (which includes all subdomains) or a specific URL prefix (which includes only that specific address and its subfolders). This is where most people start to get confused! So let me explain. Your website has multiple prefixes attached to it. There are the https/http prefixes as well as the www and non-www prefixes. For example:
https://yourdomain.com https://www.yourdomain.com http://yourdomain.com http://www.yourdomain.com
If you want to verify all variations of your website in one go, you will select a Domain property type, and you will need to verify via your DNS (Domain Name System).
If you want to verify your main variation (and then repeat steps for the other 3 variations), you will select URL Prefix.
Don’t worry. I’ll walk you through the steps of each option.

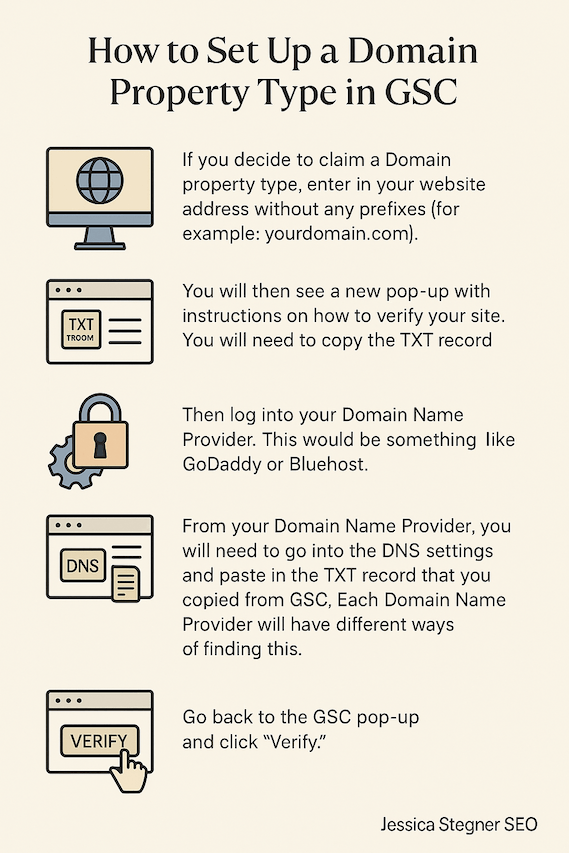
How to Set Up a Domain Property Type in GSC
Selecting a Domain Property is preferable because it includes all of the variations of your website. However it’s not necessarily if it’s too complicated for you.
If you decide to claim a Domain property type, enter in your website address without any prefixes (for example: yourdomain.com).
You will then see a new pop-up with instructions on how to verify your site. You will need to copy the TXT record.
Then log into your Domain Name Provider. This would be something like GoDaddy or Bluehost.
From your Domain Name Provider, you will need to go into the DNS settings and paste in the TXT record that you copied from GSC. Each Domain Name Provider will have different ways of finding this.
Go back to the GSC pop-up and click “Verify”.
Don’t lose me here! It’s actually not as difficult as you may be thinking! Here, let me put it in a graphic for you..
How to Set Up a URL Prefix Property Type in GSC
If you decide to claim a URL Prefix property type, you need to get the exact URL address of your website. So first open another window and go to your website. Select and copy the entire address of your homepage (for example https://www.yourdomain.com).
Then paste it into the GSC pop up window where it says “URL Prefix”.
You’ll then need to decide how you want to verify your website. There are multiple options:


Verifying your site with a Squarespace website.
HTML File Upload: Download an HTML file provided by Google and upload it to your website’s root directory.
HTML Tag: Add a meta tag provided by Google to your website’s
<head>section.Google Analytics: If you’re already using Google Analytics, you can verify your site with your existing account. I recommend this if you followed my advice and set up your Google Analytics account first!
Google Tag Manager: Similar to Google Analytics, you can use Google Tag Manager for verification.
Bonus: Another very easy option if you have a Squarespace website specifically, is that you can log into your Squarespace account, go to Analytics, click on “Search Keywords”, and then you will have a button to connect your account right there.
For small businesses that don’t have Squarespace and don’t have Google Analytics set up, the HTML Tag method is often the easiest, especially if you have access to your website’s code or can easily edit the HTML.
4. After you have verified your web address with this prefix, go back to add a property and submit the different prefix versions of your site. There should be 4 total. You don’t need to access all the properties all of the time, but it’s good practice to make sure that all of your bases are covered. The good news is that you won’t need to go through the steps of verification each time. It’s much more simple with the subsequent prefixes.
Once you have your site verified, you can view your dashboard. Note that you will not see any data generated a first. GSC doesn’t pull past data, so you’ll have to wait at least a week before you can see any real valuable data about keywords and page clicks, etc. But one thing you should do right away is submit your sitemap.
Submitting Your Sitemap
One of the first things that you should do in GSC is to submit your sitemap to Google. This helps google to find and index all pages on your site.
Your website’s sitemap is generally pretty easy to find. Start by typing in your website and then add “sitemap.xml” to the end of it. For example, “yourdomain.com/sitemap.xml”. This format is common with multiple platforms like Squarespace, Shopify, and Wix. If you have Wordpress with a Yoast plug-in, your sitemap could be “yourdomain.com/sitemap_index.xml”.
When you type in this web address, you should get a webpage that shows your sitemap. It might look like an organized table (in Chrome) or it might look like just a bunch of text (in Safari).
Once you find your sitemap, copy the address, and paste it into GSC in the Sitemap section and click “submit”. You’ll get a green success status once it’s submitted. If it’s not green right away, refresh the page or come back to it in a few minutes.
Add users to Your Account
If you need to provide access to other members of your team, or an SEO consultant like me, follow these steps to get them added to your account.
Go to settings.
Select “Users and Permissions”.
Select ““Add User”, and type in the email address of the person you want to add.
Select the permissions that you want to provide access to. For me, I always need “full permissions” to use Google Search Console for SEO purposes.
Once GSC all set up, make sure you know how to use it! Watch this video.
-
Intro to Google Search Console
Let me just show you the basics of what you can see in Google Search Console. This is my favorite tool to understand what’s happening with your organic search, so I always tell every business owner that you should make sure that you have this set up as soon as possible so that you have data to refer to.
I’m always amazed by how many don’t. So when you first go to Google Search Console you’ll see an overview that just kind of shows you how many clicks you get, which pages are indexed. I don’t really use this page very much, but this performance page is where you’ll probably spend most of your time.
Here you can see the total impressions that you’re getting, which is not necessarily somebody seeing your search results but just that your search results exist somewhere — even if it’s on the fifth page of a search that somebody doesn’t even click to. The fifth page for that counts as an impression. So it just shows that you’re relevant.
And then total clicks to your link in the organic search results.
You can change how many days you want to see here — if you want to just see like the past month or so, or if you want to see a longer period of time, you can set that however you’d like.
When you’re looking at the clicks and the impressions, one thing that you’ll notice when you first set up a website, or maybe if you first start optimizing it, is you might see for the first one to three months you might not really see much of anything with your impressions. And then you should start to see like a good growth happen.
This website’s much older, so we don’t have that here, but you should start to see a growth start to happen at some point. And then clicks might follow pretty closely behind, or it might take clicks a little bit longer to catch up. If you’re getting a lot of impressions but you’re not ranking on the first page for things, then it’s not going to translate to clicks. But the more you work on optimizing it, and the older the website gets, then the more the clicks will start to match with that.
Understanding CTR & Average Position
The other things you can see up here are the average click-through rate and the average position. So I’ll tell you what those are.
The click-through rate is the amount of impressions divided by the clicks that people are actually clicking on from there. So the average click-through rate is kind of a difficult data point to look at sometimes, because as you get more and more impressions, as you start ranking for more and more keywords, some of those are going to be on the fifth, sixth page, while others might be on the first. And that’s actually going to hurt your click-through rate — your average click-through rate here.
So it’s not really the best data point to look at. Average position is somewhat similar to that, where you might be ranking for a keyword…
If you look down here, these are all keywords that are related to one single blog post. And so you notice that there are multiple keywords ranking for a single blog post, and some of those might rank way higher or way lower than each other. And the more keywords that you have ranking on your website, the more that average position is going to change.
I hope that all makes sense to you. So I’m just going to click all of these again so I can show you down below here the different things you can see.
Search Queries Breakdown
So down here you can see the queries. These are the actual keywords that people are typing into the search bar where your website is showing up.
You can see — let’s just make the list a little longer — you can see the number of clicks to those keywords, the impressions (remember, the impressions doesn’t mean it’s on the first page that they see it, but it’s there somewhere), the click-through rate, and the position.
The average position. The position will change daily, hourly, whatever — but it’s an average.
You can also sort these. So if you wanted to sort by the lowest position, the highest position, or if you want to sort by the number of impressions, this kind of tells you what’s the most popular keywords that are out there. Or if you want to sort by clicks, which means these are the ones that are most effective for you.
You can also look at your pages to see which pages are performing the best, which pages might need some work. And once again, you can sort by all of those things.
Audience Data: Countries, Devices & Dates
You can see which countries people are viewing your website from, what kind of devices. This is really helpful to see if a lot of people are using mobile — which, for most websites, people are — so make sure that you’re optimizing for mobile.
How it’s showing up, and specific dates.
You can also — what I find really helpful — is to use this filter. So say you want to look at only… If you have an e-commerce website, you only want to look at a collection. Or you only want to look at your collection pages, or a specific category. You can filter for that.
This one is not that. Let’s look at maybe just filter for the blog post pages.
So to do this you would have the URL that contains whatever is specific to that URL slug that you have for the section that you want to look at, and apply. And then you can see only the pages that have that.
You can also, if you want to see which keywords are targeting for a specific page, you can click on the page and it’ll show you the queries that people are typing into the search bar that are bringing them to that page. And here is really helpful because you can see some of these are getting a lot more impressions — like “Northern Germany,” that’s getting a lot of impressions because it’s typed in more.
However, “Northern Germany” doesn’t necessarily fit the intent of a blog post about understanding the culture of Northern Germany. So some of these other keywords are actually better for that page for you.
That’s some of the data that you can use, and it’s super, super helpful to look at.
URL Inspection Tool
Another very helpful thing on here that you can do is a URL inspection.
To do this, you would pick any web page — I already did this one — any web page that you have on your website. And you can search it to see: is it indexed by Google? If it’s not indexed it will not show up in search results.
So if it’s not indexed, you can request indexing. And you can also use this area to see maybe why it’s not getting indexed.
If it’s not indexed, it’ll show you a lot of information. If it is indexed, it doesn’t really show you why… it doesn’t show you that. Obviously I’ll find one that’s not indexed to demonstrate for you.
But you can also see this kind of information too, like: okay, these things aren’t getting loaded, see if there’s anything in there that’s a problem.
Let’s find a page that’s not indexed.
So if you click on Pages, you can see all of your pages that are indexed versus the pages that are not indexed. And you can see down here maybe why some of those pages are not getting indexed. Some of them, they shouldn’t be indexed. Some of them, maybe they should. Maybe they’re discovered but they’re not currently indexed, or they’re crawled not currently indexed.
You can click on these and these will show you all of these pages here. So some of these things — like this one — I sure would like this page to be indexed, it’s a blog post. So we’re going to inspect that URL and it’s going to tell us it is not on Google, it is not indexed.
As we look through here we can see if we can suss out any reason why it’s not. It is in the sitemap, it does have a referring page, we don’t know why it’s not, but we can request it to get indexed. And it just takes a minute… or a few minutes. There we go, index requested.
Okay, now the first thing you should do when you set up your Google Search Console is add your sitemap and submit it. Um, that is extremely important so that it’s there, so that they know what to search for.
You can also find other things on here like Remove, which you probably won’t need to do very often. Core Web Vitals — this will basically just link you to PageSpeed Insights, which is where you can measure the speed of your website.
Um, you can also find if there are any security issues here. If you have any non-HTTPS URLs, you would want to remove those so that you only have secure links.
And down here you want to check for manual actions: no issues detected — good. And security issues: no issues detected — good. If you see anything here that is telling you it’s a problem, you should fix it, and there will be information on how to fix that on there.
One other cool thing you can see on Google Search Console is Links. This will show you, um, internally: pages that are getting linked to, like you’re linking to yourself within your own website. Externally: pages that are getting linked to, so people that are linking to you outside of your website. And then the websites that are linking to you here, um, and then the text that is being used — like the anchor text that is being used for the linking. This is really helpful information to see where you’re getting linked from.
And it gives you a good idea of how your internal linking is going. Like notice some of these are very low on internal linking and could use more.
Um, so that’s it. That’s the main things I wanted to show you on here. It is such a, such an important tool to have, and it’s completely free.
The earlier you set it up, the more data you actually have to look at and the more you can do with that data. I can’t tell you how many clients I have started working with that do not have Google Search Console set up. So then we have to set it up, and then we don’t have any data to work with.
You know, I mean, it takes a couple months to really have helpful information from it. So the earlier you can get it set up, the better.
And I hope this was helpful for you.
Understanding the Google Search Console Dashboard
Once your website is verified, you’ll gain access to the Google Search Console dashboard. Here’s an overview of the key sections you’ll find:
Performance: This section shows you how your site is performing in Google search results, including keywords, clicks, impressions, and average position. But avoid getting confused by what the data actually means. These are the most common questions and misconceptions I see come in with GSC.
URL Inspection: Use this tool to see how Google views a specific URL on your site. You can also request re-indexing if you've made changes.
Pages: This report shows which pages of your site are indexed by Google and highlights any errors.
Sitemaps: Submit your website’s sitemap here to help Google better understand your site structure.
Mobile Usability: Check if your site is mobile-friendly and resolve any issues that may affect user experience on mobile devices.
Security Issues: Google will notify you of any security issues detected on your site.
Read this article for more info on how to understand your GSC data.
Key Features Small Business Owners Should Focus On
As a small business owner, there are several key features in Google Search Console that you should pay close attention to:
Performance Report: Monitor which search queries bring traffic to which pages, and which pages on your website are getting the most/least clicks and impressions..
Pages Report: Ensure that all important pages are indexed and fix any errors or issues that may arise.
Core Web Vitals: This links you to Page Speed Insights so you can check page speed and usability for desktop and mobile.
Common Mistakes to Avoid When Setting Up Google Search Console
Even though setting up Google Search Console is straightforward, there are common mistakes that small business owners should avoid:
Not Verifying All Versions of Your Website: Ensure that you verify all versions of your site, including
http,https,www, and non-wwwversions.Ignoring Errors in the Pages Report: Failing to address errors can result in important pages not being indexed by Google.
Not Submitting a Sitemap: A sitemap helps Google understand your site’s structure and find all your important content.
Overlooking Mobile Usability Issues: Mobile optimization is critical, especially for local businesses that rely on mobile traffic.
Next Steps: Monitoring and Improving Your SEO Performance
After setting up Google Search Console, it's important to regularly monitor your site's performance and make improvements based on the data you collect. Here are some next steps:
Check Your Performance Report Monthly: Look for trends in your search traffic, and see which keywords and pages are driving the most organic search visitors. Think of it like checking your email, but more meaningful.
Fix Coverage Issues Promptly: Address any errors or warnings in the Pages report to ensure all your important pages are indexed.
Fix Security Issues and Manual Actions: If you see any issues in security or manual actions, fix these ASAP.
Optimize Core Web Vitals: Regularly check your Core Web Vitals and work on improving loading times and interactivity.
By following these steps and using Google Search Console effectively, you can improve your website’s SEO performance and attract more customers to your small business. If you prefer, I could also set up your GSC and GA4 for you.
Alright you’ve verified your site! So take a small victory lap, sip something tasty, and then check back in a week to squint at those first impressions.
Then here’s something really cool you can do with your new data! (video below)
Want a quick win from GSC? Try the low hanging fruit method to boost pages with keywords it’s already ranking for.
-
So we're going to go to Google Search Console.
From here, you're going to click on Performance, and we want to know the average position. So you're going to click on Average Position so that it shows that.
Now, see on the right—it shows the average position of each of these keywords. They're just kind of in a random order. Now we'll be able to change the order of them.
We want that key spot of between about position 5 to like 15 or 20. We don’t want to see all the things that we're already showing up first for—we want to look for the things that we could really bump up.
So we're going to look for things at position 5 or greater. So put “greater than 4.9” in the filter, and then you can organize your position from least to greatest.
Now we're seeing all of the search terms that we're showing up for in the fifth position or higher.
When you start looking at the keywords, you're not just going to pick the first one. Like, "TSA checklist" is not something I'm going to optimize a web page for. Even though it's in position five, it only gets four impressions and zero clicks.
And the context of it is not something that I want people finding my web page from. I don't know what content is even "TSA checklist."
Like, “Where is Seattle located?” So I have a blog post all about what to do in Seattle for a week. And it's in position five. But if you look at the impressions—it’s only getting two impressions and zero clicks.
Because look at the context of it: "Where is Seattle located?" If somebody's typing that into the search bar, they're not looking for a blog post about how to spend a week in Seattle. They just want to know where it's located.
So that is not a good keyword. You have to take all these things into context—into consideration—when you're choosing a keyword that you want to optimize and boost up.
If you look here, now we're starting to see some with higher impressions and some actual clicks. And they're directly connected to that Seattle blog post:
"What to do in Seattle for a week"
"One week Seattle itinerary"
"One week in Seattle"
"A week in Seattle"
These are all good ones. And they're all ranking between the five and six range.
If we optimize for these—and I think this is the one I'm going to choose as my primary keyword: “A week in Seattle”—if we optimize for these, then we could potentially boost this blog post from a five or six up to a four or a three, depending on what it's competing against.
So we're going to choose "One week in Seattle" as the primary keyword. And then these other keywords that are related—that are also getting some decent impressions and clicks and are in a good position—can be secondary keywords.
They're kind of just like variations on that keyword, so they'll be really pretty easy to incorporate.
Some of them, like "Week in Seattle," is so close to "A week in Seattle"—like it’s included in it—that I’m not going to waste my time writing that down.
So I’m making a list now. My primary keyword is "A week in Seattle."
Then I have these other words:"One week itinerary" is good.
"One week in Seattle" spelled out is also good.
So these are all good secondary keywords that I can incorporate on my page.
But my primary keyword is the one that I'm going to pay the most attention to. The other ones will just fit in in some of the secondary placements—like maybe on some images, or some H3 headings, or within the text.
I'll just look through a little bit more and see if there's anything else that fits with that article.
You can also click on the keyword and it'll bring you to show you the page that it is. Or you can just go to the page and click on the page, and it'll show you all the queries that are connected to that page.
That's another way to search through.
And if you don’t have a good tracking system—like if you don’t have SEMrush or something—you can just take a screenshot and see what the clicks and impressions and positions are, and just save that to your computer.
Because you'll be tracking this over a few months.
SEO takes time, and so tracking it over a few months is really helpful.
I like plugging my keywords into SEMrush because I pay for that, and I have keyword tracking on that—so I get updates every week on how they’re doing.
But I mean, just taking a screenshot or something is great too.
So here’s the blog post: "One Week in Seattle." That was one of my secondary keywords.
When I look at the URL, it’s just: /tips/seattle.
So it doesn’t have the whole keyword “week in Seattle” or “a week in Seattle,” so I could potentially change that.
But if I do, I really have to know what I’m doing and make sure that I set up some 301 redirects so we don’t get any broken links and lose all the traffic that I get from elsewhere.
So the title could be changed to “A Week in Seattle.” I’m not super worried about that—it’s close enough.
Then we’re going to look at the first paragraph, and I notice here that that keyword is not in the first paragraph.
So we’re going to look for the best place to incorporate that keyword naturally into that first paragraph.
Then we’re going to look at all the headings. So we’ve got this "Transportation," "Where to Stay"—those are like some little subheadings in an intro.
And then we’ve got all the rest of the headings are days of the week, which is not going to help me with my SEO at all.
So let’s look at the back end of it and see what’s going on here.
We’ve got—okay, these are H3 headings, so they could stay that way.
We can add the word "Seattle"—like "Transportation in Seattle," "Where to Stay in Seattle."
These are Heading 1s—H1s—and that is not ideal, because your title should be the only H1.
So we’re going to actually change these to H2s—Heading 2s—while we’re fixing them.
And then I also might add an extra H2 that’s like:
“What to Do for a Week in Seattle”
Or whatever that secondary keyword was—as another heading just above the days of the week listed with the activities.
But for each of these, I’m going to leave the day of the week because I like that it’s organized as an itinerary.
But then I’m going to add to it—after the day—like by the neighborhood or whatever.
So on the back end we’ve got the SEO Title, which, like we said, we might change to “A Week in Seattle.”
But it’s not that big of a deal—it’s close enough.
And then we’ve got the meta description. And the meta description is what somebody sees when they search in Google—it’s the text that pops up.
So we want to make sure that’s really good, that it includes the keywords, that it’s between 150 and 160 characters, and that it entices somebody to want to click on it.
So images: looks like the file name is "Fremont Troll." Okay—so that could include the word "Seattle" in it.
The image alt text is missing. So we want to make sure that we describe what’s in the image, and then also include the keyword or secondary keywords into that description where we can.
There’s some nice captions under the photos, which is nice too. But we want to make sure that we have the alt text.
So yeah—we’ve got a great plan of what to do next.
I know you can do it. Happy optimizing, and I’ll talk to you next time.
If you’re ready to take your website’s performance to the next level, consider booking a comprehensive SEO audit Roadmap with me. I’ll provide an in-depth analysis of your site and actionable recommendations to help you achieve your business goals.
Check out this other article about how use use the data in Google Search Console to optimize your old content.